Monday, November 21, 2011

Tutorial: shopping tote

Finally I found some time to write down a tutorial for the shopping tote I made.


Tutorial Shopping Tote


1. Start with cutting the fabric. I used a plastic shopping bag of the desired size as a template.
2. Mine had the size of 42cm by 57cm. The gap at the side is 4 by 14cm. The middle gap is 18cm wide. The top of the handles is on the fabric fold.
3. If it is not possible to cut the front and back out of one piece (for example if the design is not nice upside down), you can cut two pieces and then sew the front and back together at the top of the handles. I used a french seam for this. The red lines indicate how. This is also called a flat felled seam. A tutorial can be found here.


4. Sew the sides together, again with a french seam (flat felled seam).
5. Top stitch this french seam at the sides: it will look like this.
6. Make pleads at the sides of the bottom and pin
7. Fold a seam at the bottom inside the pleads.
8. Top stitch severel times to secure the bottom seam.


9. Use biais band to finish the sides of the handles of.
10. Fold the handles, and stitch to secure at the top.
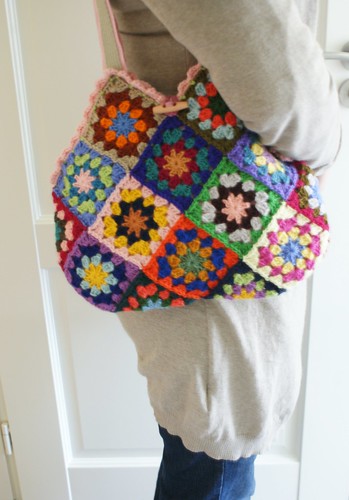
11. The end result in use ...
12. ..... and easy to fold in a small package.

Have fun

Sunday, November 13, 2011

WIP: beige crochet bag

Yesterday I wrote about the bag that I'm making. The handles are attached now, lining still to do.
Here is the result so far (taking a nice picture with the bad light this time of year appears to be very difficult).


I made the handles from two belts of 75cm

Saturday, November 12, 2011

Pinterest

I've been neglecting my blogging last week. I've been very active on pinterest instead (you can follow me here).

I have been crafting last week, but I forgot to take photo's, they will follow later.
Yesterday I made some beads using FIMO with my daughter. It was the first time we used it and we had hours of fun already. So I made a pinterestboard with inspiration and tutorials:

snapshot:


And I'm busy with yet another crochet bag. Just attached the handles. Now the lining. Some inspiring pins can be found in my board "bags"


Saturday, November 5, 2011

Granny square bag - how to

Today I finished the granny square bag for my daughter. I have been combining some tutorials for this project. Here a wrap up of the project.


For the design you need 13 squares - mine were 11cm by 11cm. The layout is as follows:


So corresponding colors should be match and there are three squares that are folded in half to connect the front and the back.

For the squares I used the granny square pattern that I found on Rose Hip. I understand from friends that they find it difficult to crochet 3D flowers and especially figure it out from the desciptions. Therefor I made a small tutorial.

As I do not like to put all the squares together at the end, I joined them as I went. On attic 24 is a very clear tutorial on how you can join squares on the go.

For the handles I made a chain of 84 stitches (beige), on the second row (turning) I repeated 4 chains, 1 triple crochet in each 5th chain of the first row. This made the 'ladder' for my ribbon. Then I used orange for the sides: 3 double crochets in the TC of the beige and then 1 single crochet around the 4 chain spaces.

Finally, for the lining I combined two tutorials. It was very helpful to sew in the lining while the bag was inside out like was suggested in the tutorial on While they play. Further I found the tutorial of Future Girl very clear.

Friday, November 4, 2011

New bag

Last week I made a granny square bag for my daughter. And as it normally goes: hers is now completely finished and i still have to put some lining into mine......

Here's the result:

Saturday, October 29, 2011

Pinterest

Since yesterday I have a pinterest account. Have been filling it with stuff that I collected in a word document, which was a far from ideal way to save them.

You can check on: http://pinterest.com/nynkestone/

WIP: granny square bag 5

Yet another update. I've added some handles.


Now only the lining left ....

Thursday, October 27, 2011

WIP: granny square bag 4

Another update: finished the last two squares and made a border at the top:


And now there is the challenge to make some nice handles. And finally I have to decide on the lining....

Wednesday, October 26, 2011

Newest buy

When I was at Ikea I bought this wonderfull fabric. What should/ could I do with it.....

Tuesday, October 25, 2011

WIP: granny square bag 3

And today another update on the granny square bag. I've added two more block to the work. The back has its final shape now..

Monday, October 24, 2011

WIP: granny square bag 2

I made my first squares of my granny square bag and since I don't like the "putting it together" at the end and the "weaving the loose ends" I try to do this as much as possible during the proces.

Here is the current status; its already starting to look like a bag....:


I started with the small squares with a rose in the middle, of which I took 4 to form one square. The pattern/tutorial is from Rose Hip.


 I thought that it would be too much roses if I would do all the blocks like this, so I decided to make a block with only one, but a little bit larger rose. I adjusted the pattern of Rose Hip, by adding a third ring of petals to it. Just like the second row, but now 4 chains instead of 3 and * 1sc, 7dc, 1sc * for each petal. The background color was attached to the second ring of petals just like in the pattern for the smaller rose.

At "the back" of the bag I used blocks in 2D rather than 3D. As a basis I took the "Somalia" from Nadelspiel. It comes with a youtube instruction. I will make four of these squares.
Because I'm using my scraps, not all the yarn is of the same thickness, so I have to cheat here and there. In the middle of the Somalia's I put a block with four friendship rings. It is from a pattern on allfreecrochetafghanpatterns. The pattern is quite easy although I misread at some point and that took me some time to figure out.

 Now still four blocks and the handles to go, of which one is on its way.

Sunday, October 23, 2011

WIP: granny square bag

Well, I already crocheted a second tote with my newly selfadjusted pattern. Here's the result:


Now it is time for something else. I saw some examples of a bag with granny squares. And a granny square that I likes very much - so that made the beginning.

The square that started it is a lovely one with a flower in the middle of it. It is a wonderfull pattern on Rose hip.

The bag is going to be something like this:

    DSC01109
It can be found in many forms; the left one is on crafster. Later I found the right one which is on Dutch Sisters.

And now that I finished some squares I found out that this is going to take a more time than originally intended. So it doesn't quite fall in the quick pattern category that I wanted for my green groceries project, but I think the end-result will be worth it.

Friday, October 21, 2011

Two more totes

I already made two other totes.

One is made of fabric, and I replicated a plastic bag that had nice dimensions. It works very well. I will make a tutorial later.

The other one is crocheted. It is after the pattern that I used earlier. However, that tote was a little bit too long and to slim. So I adjusted the pattern. This tutorial will also follow later.

Here´s the result:

Thursday, October 20, 2011

Tote

For my green groceries goal, I started to make totes. The first one is after the Piekeboe pattern of Eloleo.

The result is not entirely what it was intended. Sometimes I have a project that seems to attrack to make errors....;-( Then even the most simple things seem not to go as its supposed to be. I forgot the elastic band, cut only two handle pieces instead of 4 so I had to improvise on the fabric since I didn't have enough, etcetera.

Anyway, I still like the design very much, but I discovered that it is not the most suitable pattern for my current goal. I think I need a simpler pattern to be able to make a lot of bags in a short period of time. Furthermore the handles in the pattern take a long piece of fabric, which I usually do not have as scraps.

Well, although not the best project ever, here are the photos.


Tuesday, October 18, 2011

Tissue holder

For a friend I made this tissue holder, after the tutorial of CraftSnob. I’ve added her initials.


I think that this makes a great small gift.

Monday, October 17, 2011

Projects

For the next months I've set myself three projects:

  1. Green groceries
  2. Green wrapping
  3. Marble bags
1. Green groceries
My goal:  to take no plastic bags anymore in shops

Our supermarket shopping was already 99% green. That is we always take reusible bags etcetera with us. Only for the unexpected shopping I had to buy a new one or take some plastic bags. However with the other shopping still a considerable amount of plastic bags come into our house (which we already try to reuse as much as possible).
To reduce also this use of plastic bags, I started to make some shopping totes from fabric. Nice to try the different pattern that are out there, reuse some favorite scrap fabric. And it seems to be a prerequisite to reach my goal.

2. Green wrapping
My goal: to wrap at least half of the gifts eco-friendly

With the holiday season approaching I'd like to try to wrap the Sinterklaas and X-mass gifts eco-friendly. Especially the Sinterklaas will be difficult as I will have to explain why Sinterklaas is not using paper wrapping this year and does this only in our household.

3. Marble bags
My goal: 35 bags before june next year

For the birthday of my youngest I want to make 35 marble bags for the children in his class. The last time I noticed that when you do them all in the last month it is getting rather boring to make them. So this time I will start early.

Tuesday, October 11, 2011

Kidlets

I mentioned the kidlet of JCasa in a post in august.
I adjusted the front pocket a little bit. It works perfectly for the hair clips of my daughter.

Saturday, October 8, 2011

Lists: shopping totes

The projects of morsbags and green bag lady have inpired me to try and stop our use of plastic bags completely. We already have reduced a lot of its use. When we do our groceries we use 'klapkratjes', a word that I don't know how to translate so here's the picture:

Still, I collect a lot a plastic bags in other shops. To really make it work I have to have more shopping totes, in onder to always have one with me, (and maybe give some away and inspire others). So.... this time a list of nice shopping totes to make. Criteria: comfortable to use, quick to make and/or reasonably fashionable....

  1. Very simple, straigth forward and quick totes (half an hour?) come from morse bag and green bag lady
  2. A little more advanced than the morsebag, with a pocket in front to fold the bag in: the recycle project of Eloleo
  3. The piekeboe from Eloleo can be folded into a small packet
  4. A model that does not have sewn on handles but integrated in the pattern: the quick carrier of earth girl fabrics
  5. A larger model with a round bottom comes from The Purl Bee
  6. A model with a litlle more space because of the pleads at the bottom comes from Crafster, it is based on a plastic bag.
  7. And a very advanced project: wallet to tote with a zipper from sew mama sew
  8. Another possibility is to crochet a tote. I already made one, but I made the model a little bit too long. I can't find the pattern anymore, so I may try another like from The adventures of Cassie
Finally I've found the Green Grocery Bag Challenge on sew mama sew from last holiday season. Such a nice idea to try and cut down in the use wrapping paper. .....next project.

Tuesday, October 4, 2011

Finished patchwork blanket

From old jeans I've made my first patchwork blanket. If you look too close you'll see some points to improve in the future, but ...... I still like the overall picture very much....


Thursday, September 29, 2011

W.I.P.: another blanket

For my daughter I've also made the front part of a blanket. This is a normal sized 1-person bed. I used scraps from the marmble bags that I made for her birthday. Still have to decide what to put at the back....

Wednesday, September 28, 2011

W.I.P. : blanket

A concussion kept me from blogging the last weeks, so I share some foto's of work in progress.

This time a blanket for a junior bed, made from scrap fabric. I still haven't decided on the fabric for the back, an how I will make the edge. I saw some nice examples with piping.


Real fun to use scraps that have a lot of memories.


Tuesday, September 27, 2011

Tutorial: felt pasta

This is a very easy project. Making pasta from felt. The end result will look something like:


Tutorial:
In fact, it is so easy that you can put the tutorial in one picture.

  1. Cut rectangles of about 3 by 4 cm out of felt (orange, beige, green etc).
  2. Cut the short edges with pinking shears (hope this is the correct word, in Dutch kartelschaar, see picture)
  3. Then wrinkle it in the middle and fix it with a couple of stitches: done!
  4. Depends on the size of the doll family how many pasta's you will have to make ...

Monday, September 12, 2011

Tutorial: simple bag for marbles

Here is my second tutorial: this is one of the simplest ways to make a bag for marbles. Ideal project for scrap fabric.

Tutorial


  1. Cut two pieces of fabric, one stirdy for the bottom of the bag, one more thin for the top of the bag, so that the drawstring will close nicely. I cut my pieces: 32 cm by 13 cm. You can combine any size, or even take just one piece of fabric, just as long as the result is about 32 cm by 24 cm.
  2. If you like to add a figure, you could just take any shape and cut it out of felt. This is just optional. 
  1. Sew or serge the two pieces together, right sides facing each other. The result is a rectangle of about 32cm by 24cm.
  2. Optional: pin the applique into place; account when centering/placing the applique for folding the fabric later and also for the seams at the sides.
  3. If you use felt, an easy way to attach the applique is by just stitching along the sides. No zigzag needed here.

  1. Sew or serge along the bottom and side edge
  2. Keep the bag inside out, fold the fabric in twice so that the edge of the fabric is in the hem.
  3. Sew around; make sure to leave open enough space to put a string in. It is nice to have the opening at the middle of the back of the bag. Backstitch at the beginning and the end, to fix the opening. With a safety pin you can now put in the drawstring.
  4. Turn the bag, the opening of the drawstring is now on the inside. Ready!

Thursday, September 8, 2011

6 on a row : pretend and play professions

I’ve always liked to make lists. So why not on my blog. And how many on a row. I chose 6; 6 is a very special number for mathematicians: 6 = 1 x 2 x 3 = 1 + 2 + 3. Now each week 6 on a row

Pretend and play professions
In the last issue of At home kinderen there was a special on pretend and play professions. I like this ideas very much so here my list of professions and the result of my search on the internet.
1.       Chef

My children like to play ‘restaurant’. For which they usually use the apron and chef’s hat that I made for one of their birthdays.

Later I made some pasta from felt. A very easy task.

2.       Postman

I’ve been planning to make some of these for a while now. Still haven’t found the time, but I think they would have a great time playing with it.

On Momfetti I found a nice tutorial for fabric postcards. On In color order a tutorial for a fabric envelope. A mailbox tutorial I’ve found on Giverslog. And a complete set of pretend and play mail carrier set on Twelve crafts till Christmas.
3.       Bob the builder

Inspiration for a felt toolbox I’ve found on Fairyfox. A tutorial for a toolbelt can be found on Make it and love it.
4.       Docter

I found a nice docter’s bag, an example of a VET’s play set, and fabric band-aids
5.       Shop keeper

For my children I made some grocery bags/shopping tote.

I’m still planning to make them some extra felt groceries. I found a nice list of tutorials on Skip to my Lou
6.       Knight

For carnival I’ve made a knight’s outfit. I hope to make a tutorial for that in the future. They wore it with grey tights. The top is easy to put on for littele children. It is even reversible, so that they can choose their outfit.


Friday, September 2, 2011

Tutorial servettenbloem / paper napkin flower


Deze bloemen van servetten of papieren zakdoekjes leerde ik als kind maken van mijn moeder. We hebben er door de jaren heen heel wat mee versierd. Hier een stap voor stap uitleg. Erg simpel en goed te doen met kleine kinderen.

I learned to make these flowers from my mother when I was a little girl. They are easy to make also with young children.

Tutorial

  1. Take a paper napkin or handkerchief with multiple layers. Cut of the sides that hold the layers together.
  2. Cut it in two equal sized rectangles.
  3. Put them on top of each other.

  1. Fold it like a harmonica.
  2. When done, hold it together in the middle with a piece of rope or ribbon

  1. Pull the upper layer upwards and shape a bit
  2. Pull the layers one by one, first one side and then the other side. Done!
Variations:
  • Combine napkins of different colours.
  • Instead of having a flat bottom like the flower has here, you can also pull them in two directions, giving you a round flower.

p.s. This was my first tutorial, so if anything is unclear I'd like to hear it from you

    Tuesday, August 30, 2011

    Bakfeestje / baking party

    Mijn jongste dochter wilde op haar verjaardagsfeestje koekjes bakken. Voor de gasten en de jarige jop maakte ik schortjes en koksmutsjes om tijdens het bakken te dragen. Groot plezier.

    De koksmuts heb ik van stevige stof gemaakt. Deze heb ik in vouwen gestreken en bovenaan vastgenaaid. Onderaan zette ik er een strook van de zelfde stof op. De sluiting was van klitteband, omdat ik geen idee had hoe groot de hoofden van ons gasten zouden zijn.

    Het schort / sloof is een recht stuk delfts blauwe motief stof, lekker makkelijk over de lijnen van het patroon te knippen. De rode band zorgt voor het contrast. Die was nog het lastigste omdat de stof bij het naaien nogal glad bleek te zijn. Uiteindelijk bood de strijkbout uitkomst.


    For her birthday my jongest daughter wanted to bake some cookies with her friends. For the occasion, I made them each a toque and an apron. The toque was made of sturdy fabric, in which I ironned some folds. The apron was made of Delft Blue fabric, which contrasts nicely with the red.

    Monday, August 29, 2011

    Potloden rol / pencil role

    Voor de potloden van mijn dochter maakte ik dit mapje. Flap over de potloden en dan oprollen. Zo vallen ze er niet uit.


    For the pencils of my daughter.

    Sunday, August 28, 2011

    Haken met plastic tassen / crochet with plastic bags

    Van plastic tassen heb ik bolletjes 'wol' geknipt en daarmee dit tasje gehaakt. Het was een erg leuk werkje. Op internet staan verschillende manier beschreven waarop je garen van plastic tassen kunt maken. Bijvoorbeeld het aan elkaar knopen van lusjes of het vouwen van de tas. Zelf vind ik het het makkelijkste om vanaf onderaf de tas in een soort spiraal te knippen. Ook als de plastic tas zijnaden heeft is dat geen probleem. Het voordeel is dat je prettig lange stukken krijgt en er weinig aan elkaar te knopen valt. Als je goed kijkt kun je nog de bekende kleuren van Hema, Zeeman, Etos enzovoort herkennen.

    Ook heb ik ontdekt dat je het beste de draaduiteinden direct kunt wegwerken door erover heen te haken. Leg ze daarvoor op het werk en haak de steken die je insteekt hieromheen. De uiteinden zijn namelijk niet zo makkelijk weg te werken met een naald.


    I made yarn from some plastic bags. Although there are many examples of how to cut the plastic bags such as with loops or folding, I prefer my own method: removing the seam at the bottom and then cutting the bag in a spiral way. This is also very well possible if the bags have seams at the sides; just cut over them. This makes long threads. I found it also very helpful to 'crochet the ends of the yarn in'. Immediately covering the ends up during the work is much more easy then to do it when finished the bag and having to try it with a needle.


    Friday, August 26, 2011

    Uit één dress-shirt / Out of one dress shirt

    Dit heb ik tot nu toe gemaakt uit één van de dress-shirts. Ik had geen foto meer van het overhemd in zijn geheel.


    This is what I made out of the dress-shirts so far. I still have scraps, there might come even more.